Before we get started it’s important to note that many Intel and AMD processors do ship with a cooler included in the box; you can check if a cooler is included in the Specifications tab of the CPU on the product page. As a general rule these boxed coolers do an adequate job, but are built to a budget so can be pretty noisy. It is therefore a good idea to consider buying a third-party CPU cooler as it should provide better cooling and be much quieter. What’s more, if you’re planning on overclocking the CPU for more performance from your PC then you will need to buy a higher-grade CPU cooler. Based on Scan’s extensive 30 years’ experience as a system integrator here’s our guide to buying a CPU cooler.
Types of CPU Cooler
There are three main types of CPU cooler available, air-coolers, all-in-one hydrocoolers and custom watercooling loops. The table gives a quick summary of the pros and cons of each of these types of cooler.
|
|
|
|
|
|---|---|---|---|
| Air Cooler | Hydrocooler | Custom Watercooling | |
| Cooling | Good | Good | Best |
| Complexity to install | Easy | Medium | Hard |
| Cost | Low | Medium | High |
We’ll now look at each of these technologies in greater depth, comparing their features and how they work on the tabs below.
Air coolers are the traditional and lowest cost way of keeping a CPU cool. While you’ll find air coolers in all sorts of shapes and sizes, they all comprise two main elements, a large metal heatsink that conducts heat up and away from the CPU and one or more fans that blow air across the heatsink, transferring the heat into the air inside the case. Most air coolers have heat pipes, two phase heat transfer devices, embedded in the heatsink that conduct heat even more effectively to the fins above, aiding cooling.
Air coolers are comparatively cheap to manufacture and generally very easy to install as they simply clip onto or bolt through pre-cut holes in the motherboard around the CPU socket. The downside is that they only move heat off the CPU, so a PC with an air-cooled CPU still requires case fans to exhaust hot air from around the air-cooler outside the case.


CPU Compatibility
Whether you’ve chosen to go with an air cooler or hydrocooler you need to make sure you select a model that is compatible with your CPU. AMD and Intel produce CPUs in a variety of ranges, each with their own socket on the motherboard, which has its own unique dimensions. You can check which sockets a cooler supports on the cooler product pages in the Specifications tab. Here are the list of the most common AMD and Intel CPUs and their associated sockets. These tables aren’t exhaustive, so check carefully if you’re looking for a cooler for an older CPU.
| AMD PROCESSORS | INTEL PROCESSORS | ||
| Processor Family | Socket | Processor Family | Socket |
|---|---|---|---|
| Ryzen 9000 / 7000 | AM5 | Core Ultra Series 2 | S1851 |
| Ryzen 5000 / 3000 / 1000 | AM4 | Core / Pentium / Celeron – 14th gen, 13th gen, 12th gen | S1700 |
| Threadripper 9000 / 7000 | TR5 | Core / Pentium / Celeron – 11th gen, 10th gen | S1200 |
| EPYC 9000 | SP5 | Xeon 6 P | S7529 |
| EPYC 8000 | SP6 | Xeon 6 E | S4710-2 |
| EPYC 4000 | AM5 | Xeon Scalable 5th gen, 4th gen / Xeon W‑3500, W‑2500 | S4677 |
| EPYC 7000 | SP3 | Xeon Scalable 3rd gen | S4189 |
Whilst checking for socket compatibility, it is worth understanding the TDP of your CPU. TDP or Thermal Design Power is the maximum amount of heat a CPU will generate that needs to be removed by the cooler. The higher the TDP of the CPU the more powerful cooler you will need to purchase, so it’s important to cross reference this value against the TDP removal capabilities of the cooler. You can find this information on our cooler product pages in the Specifications tab. There’s no downside to choosing a cooler with a higher TDP rating than your CPU, in fact the opposite is true, as an overrated cooler will help to cool the CPU even more effectively.
Cooler Size
CPU coolers come in all shapes and sizes so it’s important to check your cooler is compatible with your PC case.

The vast majority of air coolers will fit in most ATX cases. However, it’s still a good idea to check the height of the cooler (A) versus the width of your case (B), particularly if you’re building a small form factor Micro-ATX or Mini-ITX PC. This can be checked by comparing the values listed on our product pages in the Specifications tab.
Some large air coolers may also restrict access to the DIMM slots on the motherboard. This means you might have to temporarily remove the cooler or fan(s) if you want to change or upgrade the system RAM. Particularly large coolers may even limit the height of the DIMMs you can install, so it’s worth bearing this in mind if you planning on using particularly tall DIMMs with large heatsinks or RGB lighting strips.
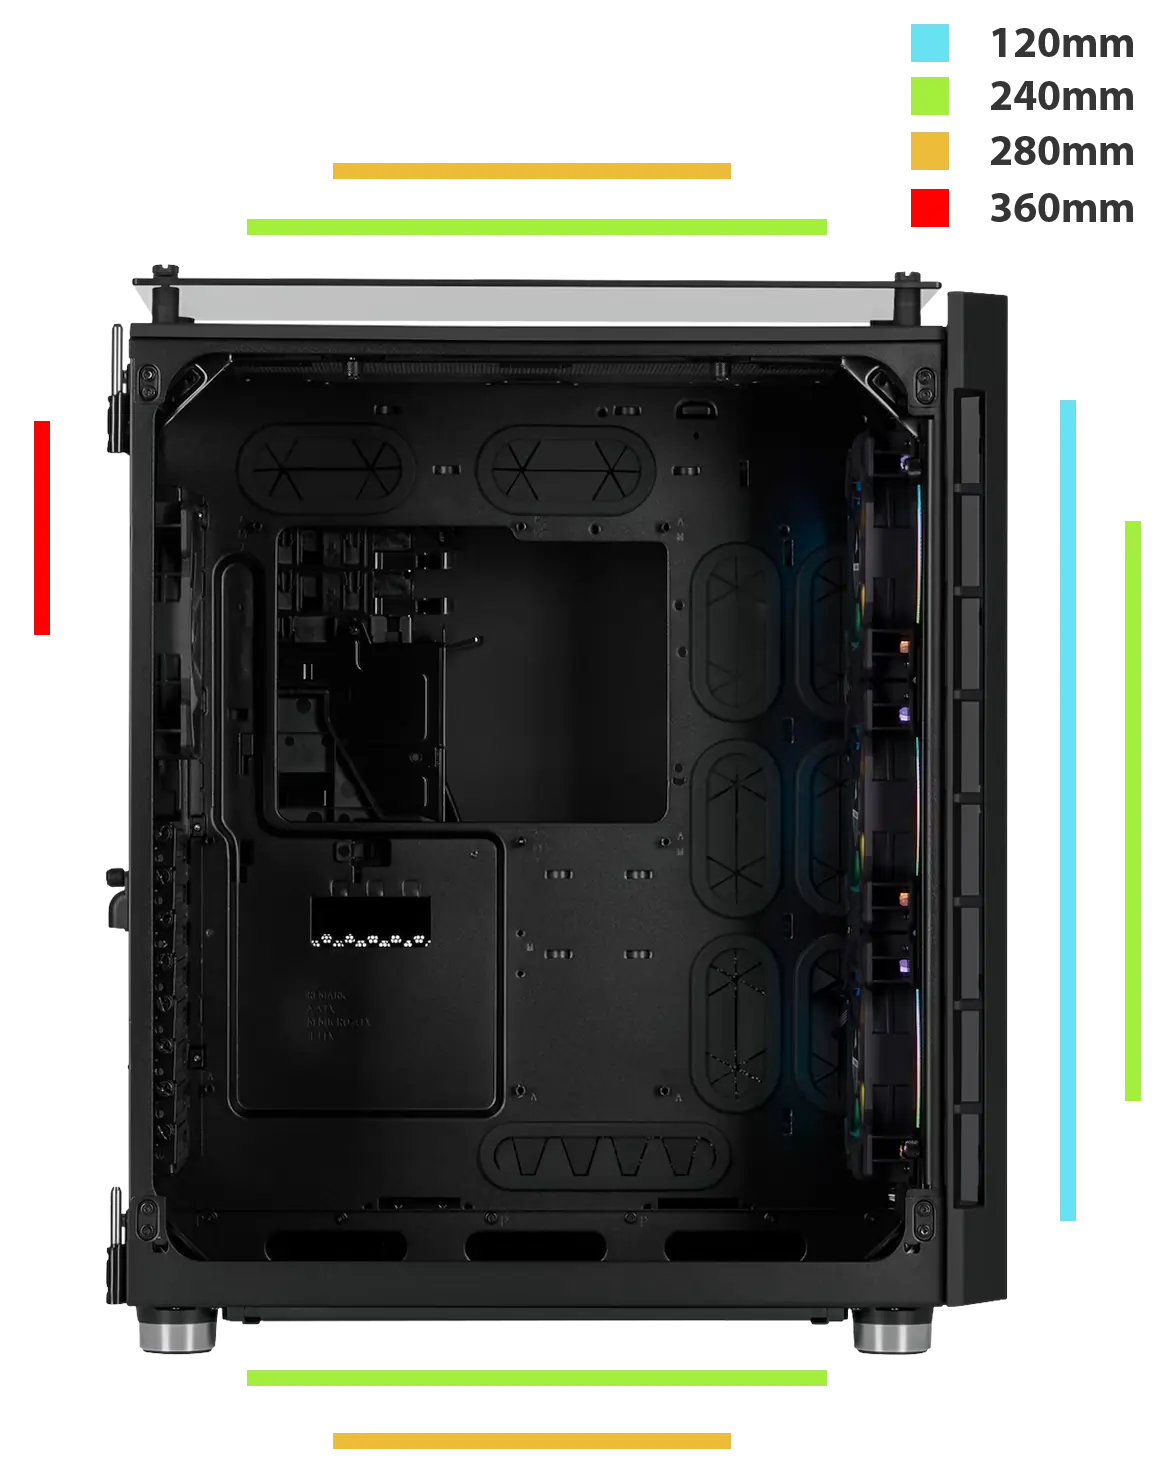
Hydrocoolers come in three main size groups - either 120/140mm hydrocoolers featuring a single fan, 240/280mm hydrocoolers with two fans and 360/420mm hydrocoolers that have three fans. Our PC case product pages clearly state in the Specification tab what size hydrocooler size they will take and what radiators are supported. Many hydrocoolers also feature RGB lighting to enhance your PC.
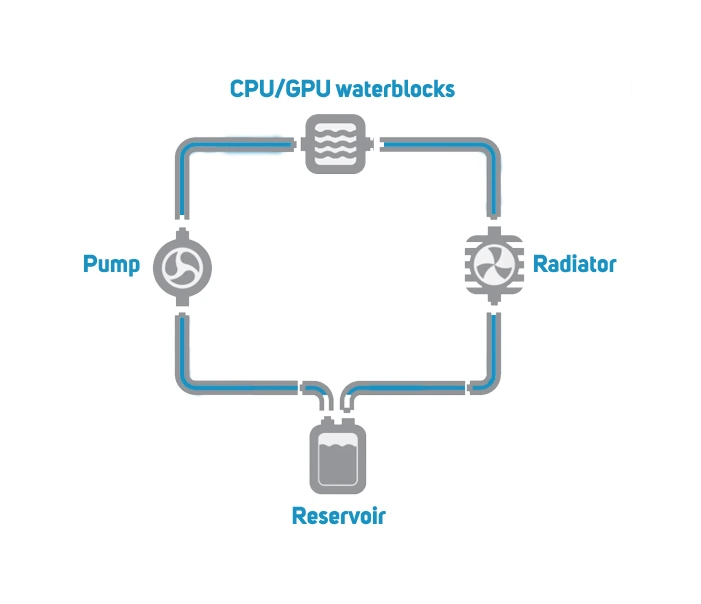
It is worth mentioning that the pump functions best when it’s at the lowest point of the hydrocooler loop. It is liquid pump, so if air gets trapped in there, it can create noise. Seeing as air is lighter than liquid, it will always rise to the highest point of the loop, so if you keep the pump at the bottom, it will remain free of air.
Cooler Noise
Regardless what type of cooler you buy it will be cooled by one or more fans. The general rule of thumb is that the larger the fan, the slower it needs to spin to move the same amount of air as a smaller fan. As such, depending on the space available in your case (see above) it’s worth picking a cooler with the largest possible fans.
It’s also possible to control the speed of most fans, using what’s known as PWM (Pulse Width Modulation), to achieve the perfect balance between CPU temperature and noise. You can adjust the speed of PWM fans in a number of ways, the easiest way is via the motherboard BIOS. Many higher-end motherboards include Windows software, such as Asus Fan Xpert, Gigabyte Control Center and MSI Center, that provides the same capabilities but with greater convenience and additional features such as fan curves and RGB lighting effects.

Cooler Installation
It is also worth pointing out that as most coolers use industry standard 120 or 140mm fans, you can often replace the fans if you want something quieter or more powerful. Just make sure to keep an eye on the CPU temperature to make sure it doesn’t get too hot as you tweak or swap the fans. Browse our range of replacement FANS.
TIM needs to be applied in a specific way, if you haven’t done it before or need a refresher there are detailed instructions in our step-by-step guide on HOW TO BUILD A GAMING PC.
Ready to Buy?
Browse our selection of CPU coolers to find the perfect fit for your setup.

Frequently Asked Questions FAQ
Here are some common questions and answers to help you find the information you need.
Yes - CPUs or processors consume a lot of energy and without a cooler will overheat and shut down or could even be damaged. It’s critical therefore to install an appropriate cooler for your CPU.
Yes - CPUs or processors consume a lot of energy and without a cooler will overheat and shut down or could even be damaged. It’s critical therefore to install an appropriate cooler for your CPU.
No - CPUs or processors consume a lot of energy and without a cooler will overheat and shut down or could even be damaged. It’s critical therefore to install an appropriate cooler for your CPU.
CUSTOM WATERCOOLING LOOPS look stunning, and do provide better cooling than air coolers and all-in-one hydrocoolers, especially when overclocking, but they are not necessary.
CPUs or processors consume a lot of energy and without a sufficient cooler will overheat and reduce your FPS in games and slow down other applications.
There are three main types of CPU cooler available, air-coolers, all-in-one hydrocoolers and custom watercooling loops. Air-coolers provide good cooling, are the easiest to install and the cheapest. All-in-one hydrocoolers can provide better cooling, but are a bit more complex to install and are more expensive. Custom watercooling loops provide the best cooling, but are very complex to install and are the most expensive.
There are three main types of CPU cooler available, air-coolers, all-in-one hydrocoolers and custom watercooling loops. Air-coolers provide good cooling, are the easiest to install and the cheapest. All-in-one hydrocoolers can provide better cooling, but are a bit more complex to install and are more expensive. Custom watercooling loops provide the best cooling, but are very complex to install and are the most expensive.
There are three main types of CPU cooler available, air-coolers, all-in-one hydrocoolers and custom watercooling loops. Air-coolers provide good cooling, are the easiest to install and the cheapest. All-in-one hydrocoolers can provide better cooling, but are a bit more complex to install and are more expensive. Custom watercooling loops provide the best cooling, but are very complex to install and are the most expensive.
Liquid coolers, whether its an all-in-one hydrocooler or custom watercooling loop can provide better cooling than air cooler. This is because their radiators have a larger surface area than the heatsink of an air cooler, so they can dissipate heat more effectively.
There are three main types of CPU cooler available, air-coolers, all-in-one hydrocoolers and custom watercooling loops. Air-coolers provide good cooling, are the easiest to install and the cheapest. All-in-one hydrocoolers can provide better cooling, but are a bit more complex to install and are more expensive. Custom watercooling loops provide the best cooling, but are very complex to install and are the most expensive.
There are three main types of CPU cooler available, air-coolers, all-in-one hydrocoolers and custom watercooling loops. Air-coolers provide good cooler, are the easiest to install and the cheapest. All-in-one hydrocoolers can provide better cooling, but are a bit more complex to install and are more expensive. Custom watercooling loops provide the best cooling, but are very complex to install and are the most expensive.
A 360 AIO has three 120mm fans, whereas a 240 AIO has two 120mm fans. Therefore, all else being equal a 360 AIO will provide better cooling for your CPU.
AIO’s can provide better cooling than an air cooler, but are only really recommended with a high TDP CPU (AMD Ryzen 9 or Core Ultra 9) or if you plan on overclocking.
Water coolers, whether its an all-in-one hydrocooler or custom watercooling loop can provide better cooling than air cooler. This is because their radiators have a larger surface area than the heatsink of an air cooler, so they can dissipate heat more effectively.
AIO hydrocoolers require a case with compatible mounts for the radiator and fans, are more expensive and a little more complex to install than air coolers.
The lower the CPU temperature the better, so yes AIO coolers, and other high-performance CPU coolers will improve CPU lifespan.
AIO’s can provide better cooling than an air cooler, but are only really recommended with a high TDP CPU (AMD Ryzen 9 or Core Ultra 9) or if you planning on overclocking.
Whether you’ve chosen to go with an air cooler or hydrocooler you need to make sure you select a model that is compatible with your CPU. AMD and Intel produce CPUs in a variety of ranges, each with their own socket on the motherboard, which has its own unique dimensions. You can check which sockets a cooler supports on the cooler product pages in the Specifications tab. Check out the CPU Compatibility section of this guide for a table of AMD and Intel CPU socket types.
Some large air coolers may also restrict access to the DIMM slots on the motherboard. This means you might have to temporarily remove the cooler or fan(s) if you want to change or upgrade the system RAM. Particularly large coolers may even limit the height of the DIMMs you can install, so it’s worth bearing this in mind if you planning on using particularly tall DIMMs with large heatsinks or RGB lighting strips.
Whether you’ve chosen to go with an air cooler or hydrocooler you need to make sure you select a model that is compatible with your CPU. AMD and Intel produce CPUs in a variety of ranges, each with their own socket on the motherboard, which has its own unique dimensions. You can check which sockets a cooler supports on the cooler product pages in the Specifications tab. Check out the CPU Compatibility section of this guide for a table of AMD and Intel CPU socket types.
As the Intel LGA 1700 and LGA 1851 CPU sockets are the same physical size and use the same mounting mechanism many LGA 1700 coolers will work with an LGA 1851 CPU. However, some LGA 1851 CPUs have a higher TDP than LGA 1700 coolers were designed to dissipate, so make sure to check the cooler has a sufficiently high TDP rating. You can find this information on the CPU and cooler product pages in the Specifications tab.