TIPS FOR FILMING IN LOW LIGHT
Whether you are filming a scene at night, in a dark interior or on a creative studio shoot, filming in low light can be one of the harder and more challenging scenarios to work in as a filmmaker. If it’s done right though it can be a great way to bring a cinematic feel to your next project, so here’s some tips on what to look out for.
Choosing the right camera, and the right settings
When it comes to choosing the right camera for shooting in low light, a camera with a larger will sensor will more likely perform better in low light and produce less noise. Improvements in camera technology mean many cameras are now utilising features such as dual ISO, which gives you a second ISO range to utilise for darker environments while keeping a clean image.
If you already own a camera or have one in mind for you low light shoot, there are several settings you can adjust to achieve better results
The first one we touched on is ISO. Choosing a higher ISO setting means the signal from the sensor gets amplified and results in a brighter image. This sounds straight forward enough, however the higher the setting means the noisier the image and it can also reduce the dynamic range, but this varies depending on the camera.
The next one is shutter speed (or shutter angle). Basically, the slower the shutter speed, the more light the camera lets in per frame, so naturally the footage is brighter. The challenging part is that slower shutter speeds create more motion blur, so if you’re filming a static wide-angle vista this can be useful, but if you’re filming fast paced action you’ll need to choose your shutter speed carefully.
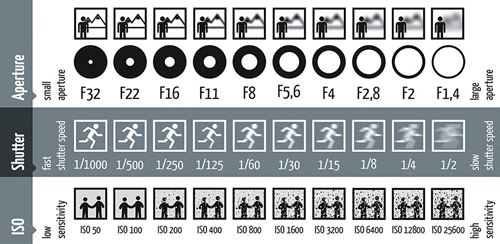
How changing Aperture, Shutter Speed and ISO can affect your image
Probably the most forgotten is the frame rate. While it might be tempting to film everything at a high frame rate to give the flexibility in post-production to slow-motion some clips, choosing this setting can lower the exposure. So, plan ahead and decide which clips you want to be in slow-motion and save those for the high frame rate recording.
Picking the right lens – the wider the aperture, the better
The lenses you pick can have a massive impact on how much light gets to the sensor of the camera.
The first thing to look for when choosing a lens before a low light shoot is its maximum aperture. Simply put, the wider the aperture of a lens the more light it lets through to the cameras sensor. This is measured as a f-stop (or T-stop) number and the lower the number, the wider the aperture. For best results look for a lens below f4 or even f2.8, and it’s important to choose a high-quality lens, as some lenses can produce a softer image at this range. It’s also worth noting that a wider aperture will also shallow the depth of field, making focusing more challenging.

How different f-stops work to let more light through the lens
If you’re looking for a lens with a wider aperture, the best place to start is with a prime instead of a zoom lens, and also avoid wide angle lenses as these are often have a narrower aperture.
Obviously filming in low light is not when you want to be using your ND filters but it’s also worth noting that certain filters, like polarisers and diffusions, can reduce the amount of light to lens, so decide carefully when choosing a filter for your low-light shoot.
Add more light, or use what’s available.
If you’re filming in low light, then the solution should be easy enough, just add more light! But this isn’t always possible, you might be in challenging location, there’s not always the time or crew, or if you’re doing the wide-shot from the drone at night, lighting an entire landscape isn’t going to be easy.
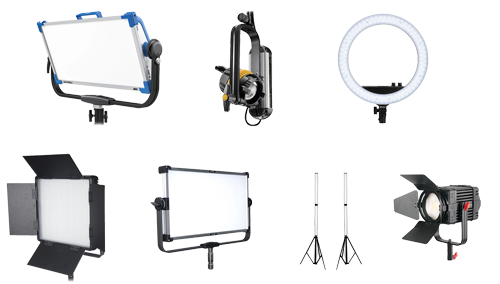
If you do have the ability to light your scene though, the advent of LED lighting is only making it easier and easier. Take filming night exteriors as an example, this once required heavy lights and stands, a generator and a load of cables but using LED lights you can now light a scene with lights that are much more lightweight, battery powered, and portable. When it comes to choosing LED lights, there are a load of options available so make sure to check some out.

If you are short on time or budget then there a few ways you can utilise natural and practical lights even when it’s not daylight. Car headlights, neon street lights, a campfire, or even a mobile phone screen don’t just have to be part of the background or a prop, but tactically used and well positioned can be used to light your subject creatively.
What you can do in post-production
Even once you’ve wrapped your shoot, it might not be the ideal solution, but there are still some things you can do in post-production with your footage.
Make sure to get familiar with colour-grading software as this can be a great tool to give a boost to any under exposed footage. Also, if you have a camera with the ability to shoot in log or raw, make sure to utilise this when filming, because when it comes to post-production this will give you even more room to play.
It’s important to have a powerful NLE system when it comes to editing in general, but some effects like noise reduction require a lot of processing power so it’s especially important here. Noise reduction can help if the ISO setting you chose was a little noisier than intended and is a powerful tool to help clean up the image.
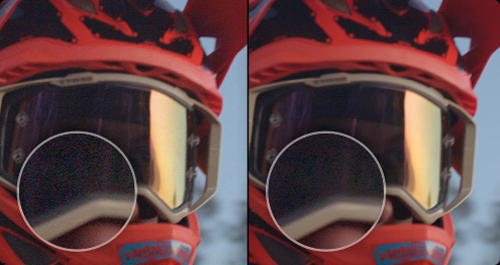
Noise Reduction - Before and After
Get Creative
There’s a few things you can do creatively both technically and artistically to make filming in low light easier.
Developments in digital cinema technology are only improving each today. Use tools like a waveform monitor to help expose correctly, or a large on-board monitor can help with checking how noisy the image is when cranking the ISO.
Artistically, there are endless possibilities to what you can achieve when adding lighting. But even in scenarios using limited natural light there are still some techniques. For example, the instinct is to light any dark spots, but try using the shadows to create a silhouette of your subject to make a cinematic look. Or you could try scouting a location ahead of time with interesting available light that could work in your favour, the point being that getting creative can open up possibilities for filming in low light and even add a cinematic feel to your work if done right.