Defending against Sieges in League of Legends
Sieges are one of the most difficult situations you can find yourself in League of Legends. Pinned to your own turret and trying to prevent the enemy from pushing down any more objectives, your team is whittled down by harassment from the enemy team. The longer the siege goes, the larger the enemy team’s advantage will grow as they take your jungle and are able to set up vision around the major objectives. But if you’re able to break a siege, the enemy will be reeling and you’ll be able to equalize vision and control around the map. Knowing how to break an enemy siege will allow you to pick more passive team compositions and come back from games that you’re already behind.
When you are forced into defending a siege, you should understand that there are three ways the enemy can "win" the siege. The first is simply having their minions slowly whittle down the structure over time. The second is picking off one of the defenders, which will allow them to commit to personally taking the turret. The final way is having a character split-push and take other objectives while the siege continues. In the latter, even if they haven’t taken the objective that they’ve set up around, they’ve gained an advantage over you.
Avoiding Champion Damage - Warding and Flanking
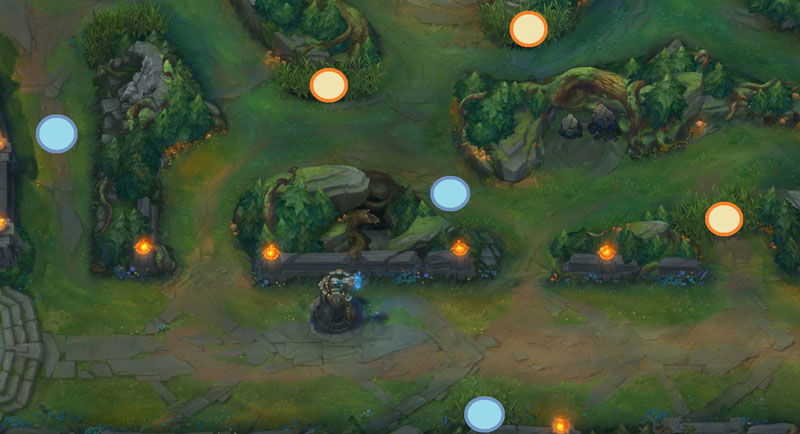
Your first goal during a siege is avoiding having one of your champions get forced off the turret by harassment. That means you need to identify what characters are the threat to your team and prevent them from hitting your unsuspecting teammates. There are two types of abilities you’re looking out for: the first are repetitive, high-damage skill shots (such as Nidalee’s Javelin, Jayce’s Shock Blast, and Ezrael’s Mystic Shot) and the second are displacement abilities that will lead to picks (such as Blitz’s Rocket Grab and Ahri’s Charm). While the former can force an ally off the turret, it’s the latter that leads to dead teammates. The easiest way to avoid damage is to ward up around the siege. Below there are maps of traditional siege points and areas to ward to avoid the enemy having strong staging areas for their siege.
Warding these areas on the outer and inner turrets often leaves yourself vulnerable to the very things that the vision is trying to help you dodge. But there is another way that you can force the enemy off of the siege. Having an initiator (such as Maokai) flank the enemy team will oftentimes cause them to back off. The recently added base gates allow this play from your own base, which is a welcome relief for teams that were often stuffed early into their inhibitor. When the relief comes, it allows you to leave your turret for only a moment while they regroup. Take this opportunity to place wards and take nearby jungle camps.

Blue circles indicate areas you can ward without risking harassment, while orange spots indicate areas that require some pressure to place. Orange indicates a traditional flanking path for an initiator.
Avoiding Chip Damage - Wave Clearing and Dives
It’s always a danger that enemies will attempt to chip down your turret with minions. In these cases, a ranged wave clear champion is ideal. Mages like Orianna, Lissandra, Ziggs and Xerath can clear swaths of minions without putting themselves in harm’s way, while AD carries like Sivir and Corki are able to rip down waves quickly. Even if you’re unlucky and don’t have strong clearing champions, there are ways you can improve your wave clear. Encourage your ADC to build Shiv over Phantom Dance, as it gives any Carry a fair bit of wave clear. (Once the AP equivalent of Shiv is released, Mages should pick that up to counter sieges as well.) The danger of putting melee characters into the wave to clear (even if they’re good wave clearers like Renekton) is that they become targets for the abilities talked about in the first section. However, if you are forced into using a melee character to clear, have your supports pile all their defensive buffs on them, as your own mages and carries return fire on the enemy harassers.
The bot inner turret is potentially the hardest lane to defend, due to the multiple ingresses and the potential for the enemy to flank your defenses. If the enemy tries to commit to a flank, retreat to your inhibitor – it’s better to live to defend that, then die and lose both.
Once a turret hits around one-third health, you should expect the enemy to begin considering a dive. It becomes much more important to clear the minion wave quickly, so that when a dive starts your own minions and the turret do substantial damage to the aggressors. You also want to hold onto big damage cooldowns (such as ultimates), instead of using them to quickly shred the wave, as they’ll be needed in the fight. When a dive starts, you’ll notice that often the enemy AD carry will not be targeting you, but the turret that you’re defending. This makes sense, as it both takes the objective the enemy team has invested so much in and removes some significant damage involved in the fight. So, if the enemy dives, counter-initiate. Don’t flee, instead kill their damage sources and attempt to stall their tanks out as long as possible under the turret.
Dealing with the Split Push
If sieges are one of the most difficult situations, a siege with a split push is certainly the most annoying. In a split push, the enemy has sent out a strong 1v1 champ (traditionally Jax or Irelia) to another lane with the intent of either taking that lane’s objectives or forcing a rotation from your team that will allow them to take their focused objective. As a rule of thumb, if the split pusher is taking an objective further into your base than the main objective, you should surrender the main objective and rotate in an attempt to kill the split pusher. While this seems fairly unintuitive, giving the other team an objective, allowing the split-pusher to dig deeper into your base means that each objective he takes is far more important than the one you are defending, and the rotation to defend that objective takes longer (as the enemy will harass you to prevent a simple Recall).
If you feel that you have a strong enough 1v1 champion to defend the split push, send them out to the flank where the enemy is pressuring. The defender should stay flush against the tower, relying on its damage to bolster his in a duel, and clear as quickly as possible. If anybody on the enemy team goes missing, alert your solo defender, as they might be attempting to 2v1 them and then take the objective.
When resisting a mid-lane inhibitor siege, you want to retain vision on the entire outer ring path. This will allow you to keep eyes on the enemy as they rotate, as well as avoid poke from enemies hiding away from the mid lane.
Breaking a Siege
The best way to break out of a siege is to catch the opponent during a rotation - to prevent defenders from setting up complete ward coverage and to capitalize on larger waves, sieging teams will often move through the jungle to another lane and attempt to push there. During this rotation, the enemy will also take your jungle creeps. It’s during this portion of the rotation, as they split up to take individual camps, that you can make a good pick. Using an initiator or character with a displacement ability, rush to a camp with your teammates. Unlike in previous fights during a siege, where your goal is to stall out until the enemy’s resources are exhausted, your goal during the break is to quickly eliminate one or two enemy champions and then retreat. If the enemy chases, capitalize on the 3v5/4v5 and kill them with your combined might. If they retreat, take jungle camps and push out all your lanes. After breaking a siege, you need to move your ward coverage out - you’ve been warding almost purely defensively for almost five minutes now, so place wards near large objectives and junctions. While the game might not be equal now, you’ve at the very least put yourself in a position that’s better than being up against your turret all game.
Tristam Mizak