Our Aim
To provide you with an overview on New And existing technologies, hopefully helping you understand the changes in the technology. Together with the overviews we hope to bring topical issues to light from a series of independent reviewers saving you the time And hassle of fact finding over the web.
We will over time provide you with quality content which you can browse and subscribe to at your leisure.
TekSpek 's

Streaming media with Windows 7
Date issued:
Overview
With the rapid growth of digital media over the past decade or two, there's a good chance you've amassed a vast library of music, photos and videos on your home desktop PC.
It's great to have an easily-accessible collection at hand, but what if you want to take the next step and share your media library with other computers/devices in the home and beyond?
Like the idea of listening to your PC-based music collection via your kitchen radio? Browsing your photos via a laptop in the bedroom? Or how about watching your videos or TV recordings from a hotel room hundreds of miles away? If so, you're in luck as this simple guide aims to walk you through the basics of sharing and streaming media via Microsoft's Windows 7 operating system.
Networking made easy
Windows 7, launched back in October 2009, is Microsoft's flagship operating system and introduces an array of new features - including a selection of enhancements designed to simplify your networking experience.
In technology terms, a network is essentially a collection of computers or devices connected together either via cable or wirelessly through technologies such as Wi-Fi and Bluetooth. In the past, creating a network required at least a hint of IT expertise - but you needn't worry, as Windows 7 makes the process of connecting multiple PCs easier than ever by using a software utility dubbed Homegroup.
Using Homegroup, we'll connect two or more Windows 7 computers and share multimedia content with the touch of just a few buttons. Here's how to do it.
You can find the Homegroup utility by simply typing "homegroup" - without the inverted commas - into your Windows 7 start menu. Click to select it, or press enter, and you'll likely be presented with the following window:

Here's where Homegroup begins to do a lot of the networking for you. At this point, it's asking which content you wish to share with other networked devices - given you the options of Pictures, Music, Videos, Documents and Printers. For the purpose of this media streaming guide, we'll be concentrating on the former three, but the same principles will apply to your documents, too.
And don't worry about other Windows 7 computers getting hold of your content - as your Homegroup is password protected.

Once you've chosen what you want to share, Windows 7 will automatically provide you with a Homegroup password. Remember to write it down and keep it safe, but don't worry about losing it - you can easily view your homegroup password from the same PC at any time.
The next step is to run Homegroup on your other Windows 7 PCs. If the devices are all connected to the Internet via a single access point - i.e. your router or modem - Windows will recognise that a Homegroup already exists and will ask you to join. In order to do so, you'll just need to enter the Homegroup password from the previous step.
That's all there is to it, and you've now laid the network foundation on top of which you'll be able to share and stream media across all of your PCs or compatible devices.
There are a couple of provisos to be aware of, however. Although this is arguably one of the simplest avenues into network media sharing, users will need to remember that Homegroup functionality is only applicable to the Windows 7 operating system. This technique won't work with a collection of computers running different operating systems - even Microsoft's own predecessors, Windows Vista and Windows XP - won't be able to join the Homegroup you create.
Windows Media Player: putting your Homegroup into practise
Now that your Homegroup is in place, it's time to organise your media. Sounds like hard work, but we've more good news as there's another Windows 7 feature - dubbed Libraries - that again does it all for you!
By default, each Windows 7 user account is pre-configured with four primary libraries; Documents, Music, Pictures and Videos.
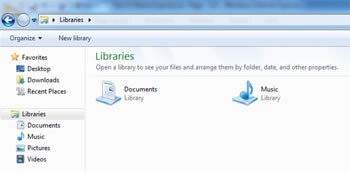
You can see the libraries in Windows Explorer, and most are accessible via shortcuts in the Windows Start Menu.
What's useful is that all the multimedia content in your libraries is automatically made available to Windows Media Player - the default music/video playback application in Windows 7. Add anything to the Music library, for example, and it'll automatically appear in your Windows Media Player music catalogue.

Here we are in Windows Media Player 12 (which is bundled as standard with most versions of Windows 7). The program - which you'll find by typing Windows Media Player in the Start Menu search box, or via a shortcut in your taskbar - is the starting point for most of your Windows-based multimedia activities.
Media Player will show you all the content stored in your own music, video and pictures libraries, as well as content available from other libraries available in your Homegroup. The above image, for example, shows that I also have remote access to the libraries on my laptop and office PC - that's because they're part of the same Homegroup, of course.
What we're more interested in at this point, however, is a menu that's new to this version of Windows Media Player - "Stream". You can see it drawn open in the above image, and it provides quick access to four menu options designed to facilitate all of your sharing and streaming needs.
Sharing your media with other devices
Starting with the very basics, the third menu option - Automatically allow devices to play my media - does exactly what it says and allows any networked Windows 7 PC or DLNA-compliant device to have access to your media library.
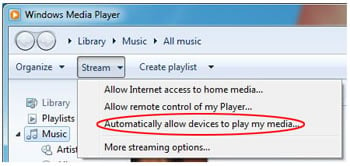
Don't let the DLNA acronym put you off, it simply stands for Digital Living Network Alliance and refers to a common standard used by numerous manufacturers to ensure networked devices are compatible with one another. That means that in addition to other Windows 7 PCs, you'll also be able to share your media library with a wide range of other devices such as games consoles, DAB radios, mobile phones and even some TV sets. In order to see which of your devices are certified as DLNA-compliant, use the handy Search & Match webpage at DLNA.org.

If your goal is to provide all networked devices with access to your media library, the automatically allow all devices option is the quickest route - select it and then confirm when you see the above prompt.

However, if you want finer control over which networked devices are allowed access, you can find detailed configuration choices via the "more streaming options" section, again found via the "Stream" shortcut in Windows Media Player's menu bar.
Clicking the link will enable you to allow or block access to your media library on a device-by-device basis, and digging deeper via the "customize" shortcut found alongside each networked device will also allow you to restrict access based on the parental ratings of your media!

Once you've made your choices, devices configured as allowed will have access to your media library - but be warned, your library can look different as you move between devices. On a Windows 7 PC, your library will continue to show as normal in Windows Media Player, but other products - such as DLNA-compliant games consoles or TVs - are likely to offer a customised library browser. Take your time to familiarise yourself with the interface of third-party products, and you should soon feel at home.
There's also a small matter of file formats that needs to be taken into consideration. Windows Media Player offers generous support for a wide range of file types, but be aware that they may not all be compatible on third-party devices.
Taking control
Now that your Homegroup is in place, your libraries are organised and your media is shared, how about learning a trick that's likely to impress friends and family?
The trick we're referring to is called "Play to", and it allows you to control the media being played on one Windows 7 PC from another. Can't get your head around that idea? Think of it this way; you could use your notebook as a giant remote control for the PC in the next room, effectively allowing you to control the media in other rooms from a single device.
It sounds complicated, but if you've managed to come this far, it should be a walk in the park.
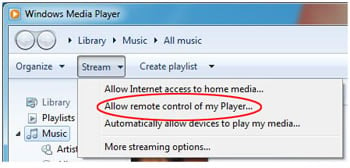
In order to use the "Play to" functionality, all you need to do is allow remote control of your player, as shown in the image above. But remember, you'll need to allow control on each Windows 7 PC you intend to control remotely.
Once you've done that, you can begin to use the Play to feature by right clicking on a media item in your library - say for example an MP3 music file - and choosing the new menu option; Play to.

With the menu option selected, you'll then be presented with a list of devices that you're able to control. Choose the device of your choice, and it'll start playing the media. Pretty cool, don't you think?
Taking your media further afield
The final section of our introductory Windows 7 media streaming guide will tackle one remaining obstacle; how do you get access to your home desktop's PC when you're out and about?
The answer's an easy one; you allow Internet access to your home media.
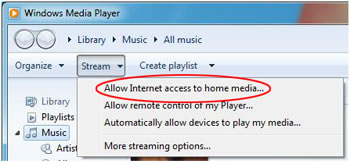
Doing so begins by selecting the menu option, as illustrated above, and then tying an online ID to your media library:

Why do you need to link an online ID? The reasons are all to do with security. In order to prevent unauthorised remote access to your media, only a Windows 7 PC linked with your online ID will be permitted to use this extra functionality.
At present, only one form of online ID is applicable - a Windows Live account - but if you don't have one, don't worry, you can get a Windows Live ID for free at Live.com.

With your Windows Live ID to hand, follow the on-screen prompts to link the account to your Windows 7 PC. But remember, you'll need to link the online ID with at least two computers - the one from which you want to share media (which technically is referred to as the "server"), and the one on which you want to access the media remotely (technically known as the "client")!
Once your IDs are linked, you'll see your server's library appear in Windows Media Player on your client PC, allowing you to playback content stored at home from any remote location with Internet access. It's a great option to have, but, as always, there are a few key points to be aware of. In order for your media library to be shared online, the Windows 7 server containing the content will need to be on a "Home" network location - that location is defined when you first connect to a network and can later be changed later from the Network and Sharing Center.
Furthermore, you'll need to remember that in order to access your media remotely, your server will need to be turned on - so you may be left with a PC running around the clock! Last but not least, you'll also need to be aware that the quality of your remote playback experience is likely to depend on the speed of the Internet connection both at the server and the client. Attempting to playback content from a remote location with poor Internet speeds could result in a stuttering image or stop-start audio.
There are now numerous new ways in which to enjoy your digital media, but we hope this simple guide serves its purpose as your first step along a media streaming road!